Thursday, 3 May 2018

Deploying out of hours shouldn't be a thing

Getting code into production should not be hard. Nor should it have to be scheduled for special times. I have recently been involved with three early morning database deployments in a row. On questioning this, I was told the app needed to be brought down for deployment. Fair enough, many legacy applications have this issue, but there are ways and means to avoid impact to users.

Alarm bells should already be ringing.

Scenario

You drag yourself groggily down the stairs after hitting snooze a few times and fumbling around for your robe while trying not wake up your spouse and kids. Logging in while switching between yawns and sips of coffee, hoping you don't make a cock-up while your brain is half asleep and all your other colleagues are out of reach. Then wait for the application guy to do their thing, all the while thinking... "I could be sleeping though this bit." Get the go ahead. Your heart drops when you realise you started while forgetting to check something because you're just that tired. Thankfully all is ok. Now wait again for the app to start and then the tests. Go back to bed. Great. Now you're wide awake at 5 am and lie staring at the back of your eyelids for two hours... and for what? Just to push a few buttons?  AAAAAH! 

Avoiding user impact like this has its risks. I don't think I need to point out why doing anything in a production system when your body is screaming at you to go to sleep, or when all the other experts that could support you are asleep, is a bad idea.

Productivity for the rest of the day will also be impacted. All in all it's a risky AND expensive operation.

Also, for the guys involved... it just sucks.

Automation:

Do we really want an expensive resource being paid to simply push buttons? Why the hell is a DBA doing a deployment in the first place? Automation is obviously the proverbial elephant in the room. Get it done! There are some great tools out there to assist with this, like Octopus Deploy, DbUp, SSDT, Bamboo, PowerShell and much more. Now the DBA can sleep. Maybe just be on call. But we're still doing deployments out of hours...

Deploying the application in hours:

You want to deploy during office hours, but without impacting users. Have you heard of Blue / Green deployments? You effectively have an offline and online production system. You deploy to the offline one, run all of your tests and when all is good, switch. Your offline becomes your online and users won't notice a thing. Something's not right? Fine. Just don't switch. No rollback required. This is particularly great for legacy or monolithic applications.

Another option might be rolling deployments. Better for load balanced applications and micro service platforms like Service Fabric. You deploy to one server / service at a time.

And you could probably do stuff with containers and other cool stuff, but let's face it... if you're having this problem then you're probably dealing with legacy or monolithic type apps.

Deploying the database in hours:

Dealing with data is usually harder than just the apps. But in this regard, it should actually be simpler. You just have to take care with how you develop and prepare your release. If you've taken care of the automation you're pretty much good. Just take care with destructive changes. Stagger them. If you need to delete a column, make the change in the app first. Then in a future release when the column is no longer being called, drop the column then. Make sure you've load tested your deployment in your staging environment so you know there shouldn't be any user impacting changes. Develop your code and test well, and you're good.

So it may take some work to get to normal hour deployments but it can most certainly be done, and with many other side benefits to be found.





Sunday, 15 April 2018

Accessing Git (Part 3) - SSH Config with multiple GIT accounts

I was going to talk about getting better integration with VSCode. There's a good article here that explains how to use the Putty toolset (caching the keys with Pageant) for managing your SSH keys rather than with SSH-Agent. It works nicely too, but I found the following downsides:
  • It's something else to install.
  • You have to either 
    • Manually add the key(s) to Pageant each time you need to access your repo or
    • Configure Pagent to load the keys on windows startup, which means being prompted for your passphrase for each key, even if you don't need them. A nuisance when you end up with multiple repos.
  • The latest version of Putty conforms to a different standard for SSH keys, so you have to convert them to use them.
When using multiple keys, I prefer a different method. Roll on the config file!!

SSH Config


With the advent of the AddKeysToAgent option since OpenSSH version 7.2 (February 2016), you now have the option to be prompted to add a key only when it's needed. That's pretty cool. This is done via an SSH config file. Check out the help page for more detail if you need to, but the below was suitable for my purposes. Namely accessing multiple GIT repos with minimal fuss.

First, you need to create the config file in your .ssh folder. The file needed is just "config" (no extension). In this file we'll put something like the following (adjust to your needs):


Host bitbucket.org
    HostName bitbucket.org
    User git
    IdentityFile ~/.ssh/id_rsa_bitbucket
    AddKeysToAgent yes
 
Host work.bitbucket.org
    HostName bitbucket.org
    User git
    IdentityFile ~/.ssh/id_rsa_work
    AddKeysToAgent yes

Host github.com
    HostName github.com
    User git
    IdentityFile ~/.ssh/id_rsa_github
    AddKeysToAgent yes


With this, I can have multiple keys, and only have the relevant one loaded when I actually need it. I have two BitBucket accounts (one for work and one personal) as well as a personal GitHub account. Let's break the above down.

Host: This is our alias. We actually change our repo URL's domain to match this. So for example, if I wanted to clone the repo git@bitbucket.org:me/repo.git which is in my work account, I would have to change the URL and run the following command:

  • git clone git@work.bitbucket.org:me/repo.git

Note that we've changed the URL to include "work." Everything that sits in the Host block is the config for that domain alias. If you already have a repo cloned and you need to change the URL, run "git remote set-url."

HostName: This is where the alias URL maps to. The actual domain.

IdentityFile: The path to the private key for your chosen account. i.e. without the .pub extension.

AddKeysToAgent: The magic bit. When set to "yes" it will dynamically load the key for your Host alias when its domain is called.

For extra info on the config, check out the online docs, but that's it for me.

SSH-Agent


Great! So now our keys get added dynamically and we only get prompted for a passphrase when it's needed. But we still need an agent to be running. Remember in part two when we pasted in some bash script to our .bashrc file to both start the agent and load the keys when we started Git Bash?  Well, now we only want it to start the agent. The keys are managed by the above config file.

Let's change it to this:

env=~/.ssh/agent.env

agent_load_env () { test -f "$env" && . "$env" >| /dev/null ; }

agent_start () {
    (umask 077; ssh-agent >| "$env")
    . "$env" >| /dev/null ; }

agent_load_env

# agent_run_state: 0=agent running w/ key; 1=agent w/o key; 2= agent not running
agent_run_state=$(ssh-add -l >| /dev/null 2>&1; echo $?)

if [ ! "$SSH_AUTH_SOCK" ] || [ $agent_run_state = 2 ]; then
    agent_start
fi

unset env


Try it! 


Now when you start Git Bash, it won't prompt you for your passphrase. But check your processes and you'll see ssh-agent running. Now access one of your repos (remember you should have set the domain alias). It's at this point you'll be prompted and it will cache the key. Do the same again with one of your other repos and it will prompt you for that one. Once added to the agent it will prompt you no more, for the duration of your agent's ephemeral lifetime.

Visual Studio Code


So back to Code. It doesn't look like Code supports SSH-Agent just yet, but as I mentioned in my previous post, you can get around this by running the command "code" in Git Bash. VS Code will inherit the environment of your Bash session, which includes the SSH-Agent environment variables. This is why I was considering the Putty approach, but with the config file now allowing dynamic adds, I much prefer SSH-Agent to Pageant.

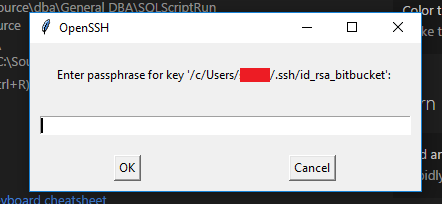
There is a way to streamline this though. I simply created a .sh file with just the word "code" in it. I then created a windows shortcut to run that file using Git for Windows. I made it prettier by adding the VS Code icon to the shortcut and used that for kicking Code off. It will even dynamically prompt you when access to a repo is needed.


VS Code Dynamic SSH prompt


The only downside being that launching Code via the context menus doesn't do it. Not perfect but close to it.

Who would have thought accessing GIT could warrant three posts, but this was part of my educational journey and was more about understanding than simply following a set of prescribed steps.

I hope this helps someone else. Let me know. Adios.

Part 1: HTTPS
Part 2: SSH


Sunday, 8 April 2018

Accessing GIT (Part 2) - SSH

The alternative to connecting to your remote repository via HTTPS is, of course, SSH. This involves generating a key pair. Encryption is done locally via a private key and you provide the public key to your GIT provider for decryption. This involves a little more setup than for HTTPS but is ultimately a more secure method.

As with part 1, this post could be much shorter to just get you up and running with SSH in no time, but I went through the pain of getting to grips with all of this myself wishing there was a single place I could have got all of this information from. This is for folks who would like to understand a little more than just follow a step by step without really knowing why or what.

Creating the keys:


Find and follow the instructions for your chosen GIT repository. It will most likely involve generating your key-pair via the GIT Bash terminal using the command line ssh-keygen, which will generate the certificate files, and then pasting in the text from the new public key to your account. That's pretty much all there is to it.

For extra security, it's worth putting in a passphrase. This means that if anyone was able to get a hold of your machine or private key, they would still need a memorised key to use it. Some sites allow you to use 2FA in addition as well. You can avoid using a passphrase by just leaving it blank. This makes things simple, but for obvious reasons is not recommended.

Set your target:


In the first part on HTTPS, we cloned a repo using the HTTPS URL. We could do the same here but by selecting the SSH option from the drop-down. It should look something like:

    git@github.com:UserName/Myrepo.git

compare this to the HTTPS URL of:

    https://github.com/Username/Myrepo.git

Or if you'd rather change one of your repo's that is currently set to HTTPS to SSH, you can do this too. Just run:

    git remote set-url origin git@github.com:UserName/Myrepo.git

To check, you can list your configured remote URLs with:

    git remote -v

Just be aware; If you connect for the very first time using a more GUI based software like VSCode, you may just get an error as it won't give you this message. Best do the first connect in GIT Bash.

Try it out:


Start with a git pull. The first time you connect it will ask you if you are sure you want to connect to the server and give you the fingerprint for that server. You can check your provider's documentation to confirm you're connecting to the right fingerprint.

At the time of writing this, you can find the RSA fingerprints for BitBucket and GitHub here:

BB: https://confluence.atlassian.com/bitbucket/troubleshoot-ssh-issues-271943403.html?_ga=2.97089951.1499627191.1523138139-1040706359.1522752215

GH: https://help.github.com/articles/github-s-ssh-key-fingerprints/

If you avoided using a passphrase when setting up your key-pair, then that's it. You never have to worry about connecting again. But if you (and you should) use a passphrase for more security, it gets annoying as you're asked for that key-phrase every single time you interact with the remote repo. That's where ssh-agent comes in.

SSH-AGENT:


SSH-Agent allows in-memory storage of a key. This runs within the session that kicked it off. You can manually start the agent in your session and add your key to it as follows:


    #Start the agent:
    eval $(ssh-agent -s)

    #Add your key:
    ssh-add ~/.ssh/id_rsa

You'll be asked for your passphrase when adding the key, but after that and for the duration of your session, you will no longer be asked for it.

Exit the terminal and you'll have to do it again. Yeah, it's not great to have to do this manually every time. Fortunately, like with PowerShell profiles, you have the ability to run set of commands automatically on each session start-up. Namely the .bashrc file which you should be able to find in your user folder.

You could just copy the above into the .bashrc file but GitHub gives us a much cleaner snippet to use.

The below snippet is taken from https://help.github.com/articles/working-with-ssh-key-passphrases. Just paste it into your .bashrc file.

env=~/.ssh/agent.env

agent_load_env () { test -f "$env" && . "$env" >| /dev/null ; }

agent_start () {
    (umask 077; ssh-agent >| "$env")
    . "$env" >| /dev/null ; }

agent_load_env

# agent_run_state: 0=agent running w/ key; 1=agent w/o key; 2= agent not running
agent_run_state=$(ssh-add -l >| /dev/null 2>&1; echo $?)

if [ ! "$SSH_AUTH_SOCK" ] || [ $agent_run_state = 2 ]; then
    agent_start
    ssh-add
elif [ "$SSH_AUTH_SOCK" ] && [ $agent_run_state = 1 ]; then
    ssh-add
fi

unset env

If the file doesn't exist, you'll have to create it, which is difficult in Windows as it doesn't like having files with an extension but no name. To create it run:

    echo "" > .bashrc

Once you save that and exit, you'll be prompted once for your passphrase whenever you start a GitBash session, and then no more for the duration of that session.

VS Code


"Brilliant!" I hear you say! Not quite perfect yet though. Try doing a push or pull via VS Code now and you'll be greeted with an error message:


Example errors from two popular repos. Permission denied (publickey) for BitBucket and Host key verification failed for GitHub. Bummer.

Remember SSH-Agent runs under the agent that started it. VS Code isn't running one. The simplest way right now to get around this is to simply start VS Code from a GitBash session that is running the agent. Simply execute "code" in GitBash to start VS Code and try a push or pull again. Bingo.

So great. That should set you up nicely, though I'm not entirely happy with the workaround for VS Code. But maybe I'll address that in part 3. :)

Part 1: HTTPS
Part 3: SSH Config with multiple GIT accounts


Thursday, 5 April 2018

Accessing GIT (Part 1) - HTTPS

So you've decided to help out on an open source project and clone a repository, or maybe start your own GIT repository somewhere like GitHub or BitBucket. Whatever the reason you'll need to decide on how to interact with your remote repository. HTTPS or SSH.

Let's play with both options. I'm assuming you have an account with your provider of choice. We'll use GitHub as an example but it won't matter if you have one of the alternatives. Just replace any mentions of GitHub with the name of your provider. I will also assume you have an existing repo as well. Gitbash will be our tool of choice.

HTTPS:


  • No setup required and no special ports required. 
  • Authentication is done via a username and password. 
  • You can also add 2 factor (2 step) authentication for extra security. 
  • Your login is the same as the one for logging into your account. So you use the same credentials for pushing, pulling, etc as well as logging into your account and changing account settings. Beware if your login is compromised.


I would suggest using 2-factor authentication and enforcing it at the account level so that all users have to use it. There will just be an additional authentication step, such as using an App on your phone to generate a code.


Get the clone URL for your repo from GitHub. Make sure you choose HTTPS. It should look something like this:
https://github.com/Username/Myrepo.git

Now clone it.

git clone https://github.com/Username/SandBox.git

If it's a public repo it'll clone. If not you should be prompted for a login. It's probably a public one, so let's do a push. Just add a file, commit it and do a git push. You should get a prompt like this:


2FA:

Of course, if someone were to learn your password the could wreak havoc in your code. Hopefully, you've configured 2 Factor (or 2 step) authentication. There is more than one way to do this so best refer to your provider of choice. Such as an app called Authy which generates access codes. If you have this set up there will be an additional prompt after submitting your credentials.

Credential Manager:

For every action you take against your remote repo, you need to submit your credentials all over again, which is a real ball ache, especially when you have 2FA enabled. Or at least it would be if you didn't have the help of Credential Manager. Remember when you installed GIT you should have seen something like this:


By default, "Enable Git Credential Manager" should be ticked. If it's not enabled, you can enable this later with the following line in Git Bash:

    git config --system credential.helper manager

Note: you may need to run as Admin to change any system config.

You'll also notice a difference in your login experience with it enabled vs disabled. Especially if you have 2FA where you might get an error if credential.helper is disabled.

If you want to play around and see how it looks, you can disable the credential.helper by unsetting it as follows:

    git config --system --unset credential.helper manager

Of course, if you have this set at local or global level as well as system, you'll need to do the same there.

You can also check out the Windows Credential Manager while you do this. Just search for an open "Credential Manager"

You can delete stored credentials from there while you experiment if you like, to force a credential prompt.

Once you've set it up, you should be good to go with VS Code as well. The same settings will apply there. But there is another method to connect. We'll cover SSH in part 2.

Part 2: SSH
Part 3: SSH Config with multiple GIT accounts


Tuesday, 3 November 2015

Dealing with Nulls in Check Constraints

A lot has happened since my last post.  I've moved to a fixer upper in a new city, changed my job and we've had a baby girl.  So I guess I shouldn't beat myself up for not sticking to my one post every fortnight rule.  Now with three under 5 kids, I suspect I still won't be making it, but here's an attempt to start :)

I recently noticed something I thought unusual with a check constraint.  One of the conditions of interest was
  • len(someCol) > 5
Here's a pseudo line of the full condition set:
  • ((Flag='Y' AND (String1='str1' OR String1='str2') AND len(String2)>(5)) OR (Flag='N' AND String1 IS NULL AND String2 IS NULL))
So you can see that it either needs to meet condition 1 OR condition 2, condition 1 being the one with the length function.

There were two things that I had to get to grips with:

1) I do not think that means what you think it means...


Null Values aren't dealt with the same by check constraints as they would as they would be in conditions in your regular code.  Check constraints pass a check, not when a condition is true, but when it is not false.  The difference is subtle but remember that SQL operates of three-valued logic.  There is True, False and also Unknown (i.e. NULL).

So if something is NULL, it is also "NOT FALSE" and will pass the check.  Be wary!!!  Here is some script to illustrate this.  
set nocount on;  --Let's get rid of those pesky row counts
declare @Flag char(1) = 'Y', @String1 varchar(10) = 'str1', @String2 varchar(10) = null;  --NULL is what we're mostly interested in here.
--Let's check the consition is some "regular" script.  Does it fail or pass?
if ((@Flag='Y' AND (@String1='str1' OR @String1='str2') AND len(@String2)>(5)) OR (@Flag='N' AND @String1 IS NULL AND @String2 IS NULL))print 'Check test condition passed.  String2 = ' + isnull(@String2,'NULL');else print 'Check test condition failed.  String2 = ' + isnull(@String2,'NULL');
--We'll need a table with a check constraint to test an actual check constraint
if OBJECT_ID('WhatTheHell','U') is not null drop table WhatTheHell;create table WhatTheHell( Flag char(1), String1 varchar(10), String2 varchar(10));alter table WhatTheHelladd constraint QuePasa check ((Flag='Y' AND (String1='str1' OR String1='str2') AND len(String2)>(5)) OR (Flag='N' AND String1 IS NULL AND String2 IS NULL));
--Can we pass the check and insert into the table with the same values?
insert into WhatTheHell (Flag,String1,String2) values (@Flag,@String1,@String2);
if @@ROWCOUNT = 1 --i.e. If the insert worked
print 'Check actual condition passed.  String2 = ' + isnull(@String2,'NULL');else print 'Check actual condition failed.  String2 = ' + isnull(@String2,'NULL');

Feel free to play around with the values, but running this as it is you'll see the following results from your testing:
Check test condition failed.  String2 = NULL
Check actual condition passed.  String2 = NULL
As you can see the results actually PASS the check constraint.  So be careful and always consider NULLs if your columns allow it.

2) The refactor factor


Have a look at definition of the check constraint created above using the following:
select definition from sys.check_constraints where name = 'QuePasa';
 Can you spot the difference?  It now looks like this:
([Flag]='Y' AND ([String1]='str1' OR [String1]='str2') AND len([String2])>(5) OR [Flag]='N' AND [String1] IS NULL AND [String2] IS NULL)
And before it essentially looked like this:
((Flag='Y' AND (String1='str1' OR String1='str2') AND len(String2)>(5)) OR (Flag='N' AND String1 IS NULL AND String2 IS NULL))
It removed some parentheses.  This is because SQL Server deemed these parentheses to be redundant, and they are according to the operator precedence.  AND takes precedence over OR.

Personally, I'll still use the "redundant" parentheses in my code as I find it easier to read and you don't always have to remember the precedence.

No longer mystified :)

Sources:

On check constraints: https://technet.microsoft.com/en-us/library/ms188258(v=sql.105).aspx
On operator precedence: https://msdn.microsoft.com/en-us/library/ms190276.aspx

Saturday, 20 December 2014

IN / NOT IN vs EXISTS / NOT EXISTS vs INTERSECT / EXCEPT vs JOIN (Part 2)

EXISTS and NOT EXISTS:

We've already discussed IN and NOT IN in part 1.  We'll use the same examples tables from there, so please run those statement to create the temporary tables that we'll be using.  Everything below was done in SQL Server 2012.

EXISTS:

Exists is slightly different to IN.  It returns a true predicate as long as one row is returned from within the subquery, whereas an IN statement will match all values from the outer query to the values from the inner subquery.  So you should be able to see right away the benefit of using EXISTS over an IN statement.  All that SQL Server needs to do is find one row, then it can stop searching for further matches within the inner subquery.  This is commonly referred to as short circuiting and can make for a much faster query.

EXISTS also allows you to match against more than one column, whereas you would have to use multiple IN statement to achieve the same thing with IN, which would be very costly.  Have a look at the below example.  Try adding a second predicate in the subquery.

select *
from #products
where exists
(
select *
from #orderItems
where productName = #products.productName
);

Quite often I have seen developers avoid using a * in the inner subquery thinking this will produce less overhead.  For example putting in a "SELECT 1" instead.  There is no need to do this.  Remember the EXISTS is simply checking to see if a row from the subquery is returned.  It doesn't care about the columns, so doesn't include them anyway.  Try running one against the other and checking out the execution plans.  You'll see they will be exactly the same.

Of interest: You'll also notice in the execution plan, that it's done a TOP (1) on the subquery.

NOT EXISTS:

NOT EXISTS is similar to EXISTS, of course, but will only evaluate as true if NO results are returned by the subquery.  Try the following:

select *
from #products
where not exists
(
select *
from #orderItems
where productName = #products.productName
);


Now we don't have the same problem that we had with NOT IN when it returned nulls.  But what if we wanted to compare two similar tables to see if any rows differ.  For example, you are bringing in data from one system to another, but don't want to insert or update any rows if an exact matching row already exists in the destination table.

Let's make another product table and alter some of the data:

insert into #products (productName,price) values (null,0);
select * into #products2 from #products;
update #products2 set productName = null where productID = 6;

Now lets try and highlight any rows that differ between the two product tables when comparing against ProductID and ProductName:

select productID,productName from #products p1
where not exists
(
select *
from #products2
where productID = p1.productID
and productName = p1.productName
);

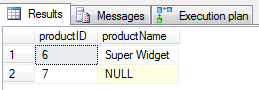
This returns the following:
Not Exists Comparison Results


Row 1:  Great.  It recognised that product 6 was different.  #Product2 had the product name for this item as null.  #Product did not.

Row 2:  Not what we wanted.  Product 7 is exactly the same in both tables, so why has it shown up here.  Remember what we discussed in the previous post about nulls and that they essentially mean "unknown."  When comparing two unknowns, the end result will also be unknown.  So it cannot match the two.

You could of course use the ISNULL function for both ProductName columns, but this adds overhead, especially if you have many columns to compare.

This leads us on nicely to the next chapter where I will go over EXCEPT and INTERSECT.

Till then, MERRY CHRISTMAS!

Saturday, 2 August 2014

IN / NOT IN vs EXISTS / NOT EXISTS vs INTERSECT / EXCEPT vs JOIN (Part 1)

There are a number of ways of filtering your data according what exists or doesn't exist in another table or result set.  These are:

  1. IN and NOT IN
  2. EXISTS and NOT EXISTS
  3. INTERSECT and EXCEPT
  4. LEFT JOIN

In this series I will address the pros and cons of each, and how they handle nulls. I won't be discussing how you use them, but rather what they do and when to use them.

Let's start by prepping the tables that we'll use in the examples:

create table #orderItems ( orderItemID integer identity (1,1), productID integer, productName varchar(100), itemTotal decimal(6,2));
create table #products ( productID integer identity (1,1), productName varchar(100), price decimal(6,2));
insert into #products (productName,price) values ('Big Widget',39.99), ('Small Widget',12.95), ('Widget Multipack',72.95), ('Black Widget',14.99), ('Big Widget',39.99),  --Duplicate ('Super Widget',99.99);
insert into #orderItems (productID,productName,itemTotal) values (1,'Big Widget',35), (2,'Small Widget',12.95), (1,'Big Widget',39.99), (2,'Small Widget',12.95), (1,null,35), (5,'Super Widget',99.99);

The examples below will all be attempting to find the products that have had an order, or products that have not.  Note we have one duplicate product and we have one orderItem that has a null productName.  It's not very normalised, but for the purpose of this exercise we'll be matching on productName.

IN and NOT IN

These essentially just create a long list of AND or OR clauses and will of course return all rows, regardless of duplicates, from the containing query that match (or do not match) the resulting values from the subquery.  Lets look at IN first:

The following two queries are synonymous.  The second query is just to illustrate the logic of how the IN operator works.

select * 
from #products
where productName in (select productName from #orderItems);

select * 
from #products
where productName = 'Big Widget'
or productName = 'Small Widget'
or productName = 'Big Widget'
or productName = 'Small Widget'
or productName = null
or productName = 'Super Widget';  

The IN operator essentially creates a bunch of OR EQUAL TO conditions and a result is returned.  Now let's try NOT IN.

Again, the following two queries are synonymous:

select * 
from #products
where productName not in (select productName from #orderItems)

select * 
from #products
where productName <> 'Big Widget'
and productName <> 'Small Widget'
and productName <> 'Big Widget'
and productName <> 'Small Widget'
and productName <> null
and productName <> 'Super Widget';

Now for a NOT IN, it creates AND NOT EQUAL TO conditions.  Because these are now AND conditions, all of the results have to equate to true.  What happens when you run either of these queries?  What did you expect? Instead of seeing the two products that have no orders as you might expect, there are no results at all.  Can you see why? Remember that a null is an unknown value.  Nothing can equal, or not equal, an unknown.  So "productName <> null" does not return as true and because all results in the subquery set must be true, no result is returned.

Summary:

  • Be wary of nulls when doing a NOT IN.  Know your data if you plan on using NOT IN.
  • All rows will be returned. If you wanted distinct product names you would would have to use something like a distinct statement.
  • You can only match on one column.


Next:  EXISTS and NOT EXISTS

Tuesday, 17 June 2014

Reseeding Identities

I did a job today where I needed to to copy data from one table to another.  Both tables were exactly the same, with identity columns and the destination table empty.  In auto-pilot mode, I was about to write a script to copy the data across, capture the new identity numbers to have them mapped to the old one (much like in my previous post Capturing identity ID's from an insert or update).  But then of course I quickly realised that there was a much simpler way of doing this.  It didn't matter if the identity numbers were contiguous. I could just switch identity insert on, and retain all the values as they were, which also made it easier when I copied across data from other tables that linked on foreign keys.

A couple of things to take note of though, when doing this:

  1. You can't just insert a value into an identity column.
  2. When you DO insert values into an identity column, the values will be higher than the next number to be generated, which will fail due to a unique constraint.
So, you first need to enable identity insert.  This will, wait for it... allow you to insert values into an identity column. Duh, right?  Just make sure you switch it off again when you're done.  This is the statement that you need to run:

SET IDENTITY_INSERT {table_name} ON | OFF;

Another thing to be aware of in order to insert... you need to specify all of the column names in the insert statement.  There's no using select *, or relying on the order of columns in the destination  table.

So you've set identity_insert to on and inserted the data, probably using insert into select.  Remember that the value of the next identity number to be generated won't be affected by the insert and so will need to be changed.  This is done using the DBCC CHECKIDENT command, which can also be used to see what the current identity value is.  To reseed though, you will run the following:

DBCC CHECKIDENT ({table_name}, RESEED, n);

Where n is value of the next number you want to have generated minus 1.  So if the highest value of the records you've inserted is 666, then you will reseed the column to be 666, and the next number it generates will be 667.

---------------------
--Reseed Example--
---------------------

declare @maxID int;
set identity_insert destinationTable on; 
insert into destinationTable (ID, col1, col2, col3)
select (ID, col1, col2, col3)
from sourceTable;
 
set identity_insert destinationTable off; 
select @maxID = max(ID) from destinationTable; 
DBCC CHECKIDENT (destinationTable, reseed, @maxID);


Wednesday, 21 May 2014

Recursive CTEs

One feature that I've found more and more useful (2005+) is the Common Table Expression (CTE).  A CTE essentially allows you to create a temporary table, much like a derived table, but can be reference multiple times and is easier to read and script.  But it has the added bonus of being able to reference itself in a recursive way.

As an example scenario, let's say we have a table that hold folders or areas that other records can be linked to, a document record, for example.  Now we want to be able to have as many folders and sub-folders as we like... so we contain these in a table like so:


Use the below to create this table as a temporary table.

create table #folders (id int identity(1,1),FolderName varchar(20),parentID int);

insert into #folders(FolderName,parentID) values
('Top1',0),
('Top2',0),
('Mid1',1),
('Bot1',3),
('Mid2a',2),
('Mid2b',2),
('NextMid2a',5),
('Bot2a',7);
Now lets say we have a document assigned to folder ID 8 (Bot2a).  We want to be able to show the full path that the folder is contained in, but that information isn't found in the #folders table.  We are able to trace it back though.


Looking at my extremely straight arrows, we can see that each folder is assigned a parent folder, with the top level folders having a parentID of 0.  So we can see that the full folder path for a document in Bot2a will be "Top2\Mid2a\NextMid2a\Bot2a."  So how do we get the path without writing a convoluted while loop?  Enter the recursive CTE.

Just like any normal CTE, it will have a query contained in the WITH section, however this time the must consist of two unioned select statements.  The first one will be the Anchor statement, containing only the top level records, and the second statement will be the recursive one, excluding the root folders.  Here:

with CTE as
(
    select ID,folderName,parentID,cast(folderName as varchar(250)) as path,1 as PathLevel
    from #folders
    where parentID = 0


    union all

    select f.id,f.foldername,f.parentID,cast(cte.path + '\' + f.folderName as varchar(250)),cte.Pathlevel + 1
    from #folders f
    join cte on cte.ID = f.parentID
    where f.ID <> 0

)
select * from CTE;
Running this will give you the following results:


So you can see each folder is presented with its full path, up to and including itself.  Let's process what we just did.  In the statement highlighted in orange, we simply queried to return only the top level folders.  We also created a Path and PathLevel column.  For the anchor records, the full path will be equal to just the folder name, and we'll assign PathLevel a value of one to represent at what level in a path the current folder sits in.

In the recursive statement highlighted in blue, you can see we joined the CTE itself!  This is where we link the current record to its parent in the anchor statement.  We can then refer to the previous iteration and build on the Path string value, or add a 1 for the level.

Pretty easy.  Pretty quick.

Bear in mind that this can be an expensive query with large set of data with large numbers of recursions.  Also, if a mistake is made with your joins you could potentially end up in an in infinite loop.  Or at least you would if SQL Server didn't enforce a default limit of 100 recursions.  This essentially means that (in this example) you can't get more than 100 folders in your path. If you exceed this you will be presented with the following error:

Msg 530, Level 16, State 1, Line 1
The statement terminated. The maximum recursion 100 has been exhausted before statement completion.

If you want to see this for yourself, simply change the join to "join cte on cte.ID = cte.ID"  to create an infinite loop.  You can change the default limit though by simply adding the following option at the end of your full statement,"OPTION (MAXRECURSION n)" where of course n is whatever value you choose.  Try changing the MAXRECURSION limit to 200 and running the CTE with the infinite loop again.

What other uses for a recursive CTE can you think of?


Wednesday, 7 May 2014

Understanding locks part 2 - Types of Locks

In my last post we saw how to find and determine locks on your resources.  But what are the different types of locks and what do they do?

The two main ones would be exclusive (X) and shared (S).  An exclusive locks will lock that resource to prevent any other transaction from either writing to or reading from that resource, while a shared lock will allow others to read, but not write or update.

So multiple read locks can be made on the same resource.  I guess that's why they called it shared.  Here's a simple table showing which simultaneous locks are allowed.

S
X
S
Yes
No
X
No
No

So if you have a exclusive lock, you have to wait for that transaction to complete, before your shared lock can take place.  Or vice versa.  But if you have a shared lock first, and the second one is a shared lock as well, no blocking occurs.
Another type of lock are the intent locks.  The main flavours will be intent shared (IS) and intent exclusive (IX).  
Think of these as a kind of marker, placed at the top of a hierarchical structure.  If a lock is required at row level then a shared lock, for example, could be placed on the row.  This would mean that if an exclusive lock is required on the same row, a lot of resource would be wasted in finding that row, only to find out it's already locked.  What you could do is place a marker at the table level with details about the row lock.  This saves the next transaction needlessly traversing the hierarchy to determine if a lock at row level is already in place.
Let's see it in action.  In AdventureWorks (2008 or 2012), begin a transaction with an update:
begin transaction updateit1;
update person.Person set FirstName = 'Kenny' where BusinessEntityID = 1;
In a separate query window / connection, run the query to find locks posted as in my previous post, Understanding locks part 1 - Finding locks and blocks.  You would expect to see row or key (for indexed columns) level blocks for this as we're updating only one row.  In this case you should see an IX lock on the table, and again on at least one page, finally followed by an X lock on the resource.  As you can see the details on the final actual exclusive lock trickle down through the hierarchy of the index pages. 
Now in yet another query window, run the following select statement:
begin transaction selectit1;
select * from person.Person where BusinessEntityID = 1;
If you check the locks again, you will now see something similar for S and IS locks. Same principle applies.  Now try running the same update statement in yet another window:
begin transaction updateit2;
update person.Person set FirstName = 'Kenny' where BusinessEntityID = 1;
Check the locks again and you will see anew type of lock. U and IU for update and intent update.  An update locks is simply a type of exclusive lock that will become a proper exclusive lock once it has finished being blocked.  If you now commit or rollback updateit1, the exclusive locks for that transaction will vanish, as will the shared locks, and the update locks from updateit2 will change to exclusive locks.  Commit or rollback updateit2 to clear down all locks.
Further details can be gleaned from http://technet.microsoft.com/en-us/library/aa213039(v=sql.80).aspx

Monday, 14 April 2014

Understanding locks part 1 - Finding locks and blocks

One thing I've had trouble with has been locks. What are the different types of locks and why are they important.  Locking can occur on various resources, such as a row, page, table or database.

How these locks work vary according to the lock type.  For example, you may get a lock on a row that prevents any updates to that row, but allows reading.  Or it may even prevent reading as well. SQL Server creates locks on resources to maintain compliance with the ACID principles.  In a nutshell, a lock will prevent a second user from either modifying a record at the same time as someone else or prevent reading from a resource before it has finished updating. 

A block occurs when a lock prevents another transaction from completing when that other transaction attempts to handle the same resource.  Locking and blocking are part of normal every day activity for SQL server, but sometimes they can cause application issues due to things like badly written queries or running large reports in a live environment.  So it helps to know how to locate locks to zero in on the source of the issue.

Finding locks:

First, let's create a lock or two. I'm using the AdventureWorks2008R2 database for this example.

begin transaction updateit;
update person.Person set FirstName = 'Kenny' where BusinessEntityID = 1;
Now that we have an un-commited transaction with an update, this should have created a lock, probably a row and / or key lock (more on the lock types in a later post).  Now how do we locate the locks and what types they are?  This is where the sys.dm_tran_locks DMV comes in (2005+).  Try this:
select * from sys.dm_tran_locks;
This gives some useful information but it would make a lot more sense if we joined to some system tables.  Now try this:
select db.name as DBName,l.resource_type,o.name as ObectName,au.type_desc,i.name as IndexName,p.rows,
    l.resource_description,l.request_mode
from sys.dm_tran_locks l  --Locking DMV
join sys.databases db on db.database_id = l.resource_database_id
left join sys.allocation_units au on au.allocation_unit_id =      l.resource_associated_entity_id
left join sys.partitions p on p.hobt_id =   l.resource_associated_entity_id
left join sys.indexes i on i.index_id = p.index_id
    and i.object_id = p.object_id
left join sys.objects o on o.object_id =
    case
        when p.partition_id is null then l.resource_associated_entity_id
        else p.object_id
    end
where db.database_id = DB_ID()  --Limit results to this database
    and l.resource_associated_entity_id <> 0 
    and o.name not like 'sys%'  --Ignore system base tables
order by o.name,i.name,l.resource_type,l.request_type
;
 You will need to run this in the relevant database, i.e. AdventureWorks2008R2 for this example.  This should give you something that looks like:


Now we know what resources are locked.  We can see it's against the Person table and they are row level and key locks.  We also know the lock types, which are exclusive or intent exclusive locks.


Finding Blocks:

Now let's create a block.  Open up a separate tab / connection in SSMS to AdventureWorks2008R2 while the first transaction still remains uncommited, and run the following:

select * from person.Person where BusinessEntityID = 1;
Now because the first transaction hasn't been committed or rolled back yet, this statement won't complete and is now blocked.  If you run the above query again you should notice a few more rows, in particular intent shared locks.  But we're interested in blocks only at this point.

You could run "execute sp_who2; " and check the BlkBy column for Spids that are blocking others, and then run "DBCC INPUTBUFFER(spid); " with the source spid (there may be several nested blocks) to get the locking statement that's creating the block.

Or you could again use a DMV again to make things easier to spot.  Try this:

SELECT r.session_id, db.name as DBName, r.start_time, r.status, r.command, r.blocking_session_id, wait_type, wait_time, wait_resource, cpu_time, st.text as SQLText
FROM sys.dm_exec_requests r
join sys.databases db on db.database_id = r.database_id
cross apply sys.dm_exec_sql_text(r.sql_handle) st
where r.blocking_session_id > 0
order by start_time
;
This should give you something like this:


Unlike sp_who2, this will only return blocked transactions, and will also give you the statement that is blocked and the time that it started.  Now you can use DBCC INPUTBUFFER as above.

Now commit or rollback the original update statement.  e.g. "rollback transaction updateit; "  You should now notice three things.
  1) The select statement has now returned its results.
  2) If you run the query to find locks, you should now longer see the locks
  3) If you run the query to find blocks, these will be gone too.

If push came to shove, and if there was no alternative, you could kill the spid of the transaction causing the blocks. In the above example, instead of committing or rolling back, you could run "kill 59 "  Note that in our example screenshot, 59 is the blocking spid.

In the next post I intend to talk about the different lock types.


Sunday, 6 April 2014

Saving index definitions and dropping indexes for large inserts

I was going to talk about how to capture index definitions so that you can drop indexes and then at a later point re-create them... but I got a bit carried away and wrote an SP that will do it all for you.  Before I share that though, a little something on why I did this.

Recently I've had a couple of large data migrations to do and always to tables that have a number of indexes.  There are two problems with this.

  1. Indexes add an overhead when you are inserting data and Microsoft advise to drop from one to all indexes depending on how much data you are inserting.  Dropping the indexes could add a good deal of speed to your insert.  Here is a guideline table of the indexes to drop per amount of data being inserted.  For example, you should drop the clustered index if the amount of data you are inserting exceeds 30% of the number of rows that already exist in your destination table.  Note how Microsoft advise to drop the indexes, not disable then rebuild.  The table is taken from Guidelines for Optimizing Bulk Import.
IndexesRelative amount of new data
Clustered index only30 percent
Clustered and one nonclustered index25 percent
Clustered and two nonclustered indexes25 percent
Single nonclustered index only100 percent
Two nonclustered indexes60 percent

  1.  Minimal logging can help when inserting large amounts of rows.  There are a few things you can do to avoid your transaction logs filling up, and minimal logging can help.  Plus it could also greatly improve the performance of your insert.  However, minimal logging has a few requirements.  And one of them is to not have a clustered index when inserting to a table that already has data. There are a number of additional requirements and these may vary according to your SQL version, however that's a discussion for another day. 
Suffice to say, with the two above points in mind, it would help to have something to drop your indexes, then rebuild them, without having to manually script out your indexes, then run them in again afterwards.  You'll want something you can incorporate into your migration scripts or package.

 To this end I've written an SP called dbo.DropCreateIndexes.  To use this, you should be aware of the following parameters

  • @Action:
    • Purpose - Define what you want the SP to do, e.g. drop or re-create the the indexes.
    • Options:
      • Drop - Drop the indexes on a table and save the definitions for later use.
      • DropOnly - Drop the indexes without saving the definitions.
      • Create - Recreate the indexes for a defined table, or for all saved indexes.  Definitions are deleted from the IndexDefinition table for indexes that are re-created.
      • SaveOnly - Saves the index definitions to the IndexDefinition table only.
      • Output (default) - Will output the definitions without doing any work.
  • @ShemaName:
    • Purpose - Define the schema to which the table belongs.  Defaults to dbo.
  • @TableName:
    • Purpose - Define the table to save the drop the indexes from, or re-create them to.
The SP will save any definitions to dbo.IndexDefinitions created on whatever database the SP has been created on. As SQL server doesn't seem store index definitions, this procedure will create the definitions from scratch according to what's in various system tables.  Simply use this to drop and save the indexes before your data load, then later re-create the indexes on the same table.

I have tried to cover all bases so this will also handle, multi-column indexes, included columns, filtered indexes, fill factors, table spaces, index padding, allowing row locks and ignoring duplicate keys.  If I've missed anything, be sure to let me know :)

NOTE: I have not fully tested this in all scenarios, nor have I accounted for any indexes other than clustered, non-clustered and primary keys. Please ensure you test this properly before using it.  It still needs some error handling as well.  I expect I'll be making the occasional tweak to it (such as maybe dropping clustered indexes only) as I continue to use it.  Suggestions are welcome.

A user defined function called dbo.concatStrings is also required, the script for which is below as well.  Make sure you install this along with the SP as it is required by the SP for building the create statements.

So here is the SP:

CREATE procedure [dbo].[DropCreateIndexes]
    @Action nvarchar(10) = 'Output',  --'Drop', 'DropOnly', 'Create', 'SaveOnly' or 'Output'
    @SchemaName nvarchar(128) = 'dbo',
    @TableName nvarchar(128)      --Table name or 'All' for create indexes only
   
AS

DECLARE
    @object_id bigint,
    @SQL nvarchar(max);
   
BEGIN
    set @object_id = OBJECT_ID(@TableName,'U');
   
    --CREATE SAVE TABLE:
    if OBJECT_ID('dbo.IndexDefinitions','U') is null
    BEGIN
        create table dbo.IndexDefinitions(
            ID int identity(1,1) not null,
            IndexName nvarchar(128) not null,
            TableName nvarchar(128) not null,
            SchemaName nvarchar(128) not null,
            SaveDate datetime default getdate(),
            CreateSQL nvarchar(max),
        );
    END;

   
    --SAVE INDEX DEFINITIONS FOR TABLE:
    if @Action in ('Drop','SaveOnly','Output')
    BEGIN
        --Delete any rows that exist for the same table if they exist
        delete from dbo.IndexDefinitions
        where TableName = @TableName
            and SchemaName = @SchemaName;
       
        --Create and save the definitions to dbo.indexDefinitions
        with ConcatCols as
        (
            select i.object_id,i.index_id,i.name as IndexName,stuff(
                (select ',[' + name + '] ' + case ic.is_descending_key
                        when 1 then 'DESC'
                        else 'ASC'
                    end
                from sys.columns c
                join sys.index_columns ic on ic.object_id = c.object_id
                    and ic.column_id = c.column_id
                where c.object_id = i.object_id
                    and ic.index_id = i.index_id
                    and ic.is_included_column <> 1
                for xml path(''))
            ,1,1,'')
            as ColumnParts
            from sys.indexes i
            where i.object_id = @object_id
        ),
        includedCols as (
            select i.object_id,i.index_id,i.name as IndexName,stuff(
                (select ',[' + name + ']'
                from sys.columns c
                join sys.index_columns ic on ic.object_id = c.object_id
                    and ic.column_id = c.column_id
                where c.object_id = i.object_id
                    and ic.index_id = i.index_id
                    and ic.is_included_column = 1
                for xml path(''))
            ,1,1,'')
            as IncludedColumns
            from sys.indexes i
        )
        select i.name as IndexName,o.name as TableName,schema_name(o.schema_id) as SchemaName,
            --PRIMARY KEY PART
            case i.is_primary_key
                when 1 then  'ALTER TABLE [' + SCHEMA_NAME(o.schema_id) + '].[' + o.name + '] ADD PRIMARY KEY CLUSTERED ('
            --INDEX PART
                else 'CREATE ' + case is_unique when 1 then 'UNIQUE ' else ' ' end + i.type_desc collate database_default + ' INDEX [' + i.name + '] on [' + SCHEMA_NAME(o.schema_id) + '].[' + o.name + '] ('
            end + cc.ColumnParts + ') ' +
            --INCLUDED COLUMNS
            case
                when inc.IncludedColumns is null then ''
                else 'INCLUDE (' + inc.IncludedColumns + ')'
            end +
            --FILTER DEFINITIONS
            case i.has_filter
                when 0 then ''
                else ' WHERE' + i.filter_definition
            end +   
            --COMPLETE WITH OPTIONS
            ' WITH (' +
                case i.is_primary_key
                    when 0 then
                        'SORT_IN_TEMPDB = OFF,' +
                        'ONLINE = ON,' +
                        'DROP_EXISTING = OFF,'
                    else ''
                end +
                'PAD_INDEX = ' + case i.is_padded when 1 then 'ON' else 'OFF' end + ',' +
                'STATISTICS_NORECOMPUTE = ' + case i.is_padded when 1 then 'ON' else 'OFF' end + ',' +       
                'IGNORE_DUP_KEY = ' + case i.ignore_dup_key when 1 then 'ON' else 'OFF' end + ',' +       
                'ALLOW_ROW_LOCKS = ' + case i.allow_row_locks when 1 then 'ON' else 'OFF' end + ',' +
                case i.fill_factor when 0 then '' else 'FILLFACTOR = ' + cast(i.fill_factor as varchar(3)) + ',' end +
                'STATISTICS_NORECOMPUTE = OFF)' +
            ' ON [' + fg.name + ']' as CreateSQL
        into #tempDef
        from sys.indexes i
        join sys.objects o on o.object_id = i.object_id
        join ConcatCols cc on cc.object_id = o.object_id
            and cc.index_id = i.index_id
        join sys.filegroups fg on fg.data_space_id = i.data_space_id
        left join includedCols inc on inc.object_id = i.object_id
            and inc.index_id = i.index_id;
           
           
        if @Action in ('Drop','SaveOnly')
        BEGIN
            insert into dbo.IndexDefinitions(IndexName,TableName,SchemaName,CreateSQL)
            select * from #tempDef;
        END;
       
        if @Action in ('Output')
        BEGIN
            Select * from #tempDef;
        END;
       
    END;
       
   
    --DROP ALL INDEX ON TABLE:
    if @Action in ('Drop', 'DropOnly')
    BEGIN
        select @SQL = (
            select case
                when i.is_primary_key = 1 then   
                    'ALTER TABLE [' + SCHEMA_NAME(o.schema_id) + '].[' + o.name +'] DROP CONSTRAINT ' + i.name + ';'
                else
                    'DROP INDEX [' + i.name + '] ON [' + SCHEMA_NAME(o.schema_id) + '].[' + o.name +'];'
            end
            from sys.indexes i
            join sys.objects o on o.object_id = i.object_id
            where o.object_id = @object_id
            for xml path ('')
        );       

        EXEC sp_executesql @SQL;
               
    END;
   
    if @Action = 'Create'
    BEGIN
        select @SQL = dbo.concatStrings(@TableName,@SchemaName);

        EXEC sp_executesql @SQL;   
       
        delete from dbo.IndexDefinitions
        where TableName = case @TableName when 'All' then TableName else @TableName end
            and SchemaName = case @TableName when 'All' then SchemaName else @SchemaName end;
       
    END;       
END;

And now for the function:

CREATE function [dbo].[concatStrings](@TableName nvarchar(128), @SchemaName nvarchar(128) = 'dbo')
returns nvarchar(max)

as

BEGIN
    declare @x varchar(max)
   
    select @x = coalesce(@x+';','') + CreateSQL
            from IndexDefinitions
            where TableName = case @TableName when 'All' then TableName else @TableName end
                and SchemaName = case @TableName when 'All' then SchemaName else @SchemaName end
           
    return @x;
END;

There you go.  Enjoy.  Any feedback is welcome.

*EDIT*
Here's an example:
exec dbo.DropCreateIndexes
    @action = N'Create',
    @TableName = N'dropIndexTest'

Deploying out of hours shouldn't be a thing

Getting code into production should not be hard. Nor should it have to be scheduled for special times. I have recently been involved with th...