Let's play with both options. I'm assuming you have an account with your provider of choice. We'll use GitHub as an example but it won't matter if you have one of the alternatives. Just replace any mentions of GitHub with the name of your provider. I will also assume you have an existing repo as well. Gitbash will be our tool of choice.
HTTPS:
- No setup required and no special ports required.
- Authentication is done via a username and password.
- You can also add 2 factor (2 step) authentication for extra security.
- Your login is the same as the one for logging into your account. So you use the same credentials for pushing, pulling, etc as well as logging into your account and changing account settings. Beware if your login is compromised.
I would suggest using 2-factor authentication and enforcing it at the account level so that all users have to use it. There will just be an additional authentication step, such as using an App on your phone to generate a code.
Get the clone URL for your repo from GitHub. Make sure you choose HTTPS. It should look something like this:
https://github.com/Username/Myrepo.git
Now clone it.
git clone https://github.com/Username/SandBox.git
If it's a public repo it'll clone. If not you should be prompted for a login. It's probably a public one, so let's do a push. Just add a file, commit it and do a git push. You should get a prompt like this:

2FA:
Of course, if someone were to learn your password the could wreak havoc in your code. Hopefully, you've configured 2 Factor (or 2 step) authentication. There is more than one way to do this so best refer to your provider of choice. Such as an app called Authy which generates access codes. If you have this set up there will be an additional prompt after submitting your credentials.Credential Manager:
For every action you take against your remote repo, you need to submit your credentials all over again, which is a real ball ache, especially when you have 2FA enabled. Or at least it would be if you didn't have the help of Credential Manager. Remember when you installed GIT you should have seen something like this:
By default, "Enable Git Credential Manager" should be ticked. If it's not enabled, you can enable this later with the following line in Git Bash:
git config --system credential.helper manager
Note: you may need to run as Admin to change any system config.
You'll also notice a difference in your login experience with it enabled vs disabled. Especially if you have 2FA where you might get an error if credential.helper is disabled.
If you want to play around and see how it looks, you can disable the credential.helper by unsetting it as follows:
git config --system --unset credential.helper manager
Of course, if you have this set at local or global level as well as system, you'll need to do the same there.
You can also check out the Windows Credential Manager while you do this. Just search for an open "Credential Manager"
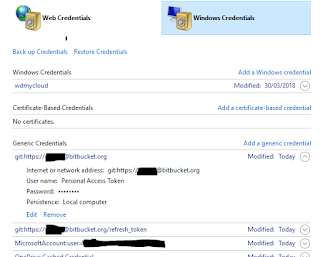
You can delete stored credentials from there while you experiment if you like, to force a credential prompt.
Once you've set it up, you should be good to go with VS Code as well. The same settings will apply there. But there is another method to connect. We'll cover SSH in part 2.
Part 2: SSH
Part 3: SSH Config with multiple GIT accounts


No comments:
Post a Comment