Thursday 3 May 2018

Deploying out of hours shouldn't be a thing

Getting code into production should not be hard. Nor should it have to be scheduled for special times. I have recently been involved with three early morning database deployments in a row. On questioning this, I was told the app needed to be brought down for deployment. Fair enough, many legacy applications have this issue, but there are ways and means to avoid impact to users.

Alarm bells should already be ringing.

Scenario

You drag yourself groggily down the stairs after hitting snooze a few times and fumbling around for your robe while trying not wake up your spouse and kids. Logging in while switching between yawns and sips of coffee, hoping you don't make a cock-up while your brain is half asleep and all your other colleagues are out of reach. Then wait for the application guy to do their thing, all the while thinking... "I could be sleeping though this bit." Get the go ahead. Your heart drops when you realise you started while forgetting to check something because you're just that tired. Thankfully all is ok. Now wait again for the app to start and then the tests. Go back to bed. Great. Now you're wide awake at 5 am and lie staring at the back of your eyelids for two hours... and for what? Just to push a few buttons?  AAAAAH! 

Avoiding user impact like this has its risks. I don't think I need to point out why doing anything in a production system when your body is screaming at you to go to sleep, or when all the other experts that could support you are asleep, is a bad idea.

Productivity for the rest of the day will also be impacted. All in all it's a risky AND expensive operation.

Also, for the guys involved... it just sucks.

Automation:

Do we really want an expensive resource being paid to simply push buttons? Why the hell is a DBA doing a deployment in the first place? Automation is obviously the proverbial elephant in the room. Get it done! There are some great tools out there to assist with this, like Octopus Deploy, DbUp, SSDT, Bamboo, PowerShell and much more. Now the DBA can sleep. Maybe just be on call. But we're still doing deployments out of hours...

Deploying the application in hours:

You want to deploy during office hours, but without impacting users. Have you heard of Blue / Green deployments? You effectively have an offline and online production system. You deploy to the offline one, run all of your tests and when all is good, switch. Your offline becomes your online and users won't notice a thing. Something's not right? Fine. Just don't switch. No rollback required. This is particularly great for legacy or monolithic applications.

Another option might be rolling deployments. Better for load balanced applications and micro service platforms like Service Fabric. You deploy to one server / service at a time.

And you could probably do stuff with containers and other cool stuff, but let's face it... if you're having this problem then you're probably dealing with legacy or monolithic type apps.

Deploying the database in hours:

Dealing with data is usually harder than just the apps. But in this regard, it should actually be simpler. You just have to take care with how you develop and prepare your release. If you've taken care of the automation you're pretty much good. Just take care with destructive changes. Stagger them. If you need to delete a column, make the change in the app first. Then in a future release when the column is no longer being called, drop the column then. Make sure you've load tested your deployment in your staging environment so you know there shouldn't be any user impacting changes. Develop your code and test well, and you're good.

So it may take some work to get to normal hour deployments but it can most certainly be done, and with many other side benefits to be found.


Sunday 15 April 2018

Accessing Git (Part 3) - SSH Config with multiple GIT accounts

I was going to talk about getting better integration with VSCode. There's a good article here that explains how to use the Putty toolset (caching the keys with Pageant) for managing your SSH keys rather than with SSH-Agent. It works nicely too, but I found the following downsides:
  • It's something else to install.
  • You have to either 
    • Manually add the key(s) to Pageant each time you need to access your repo or
    • Configure Pagent to load the keys on windows startup, which means being prompted for your passphrase for each key, even if you don't need them. A nuisance when you end up with multiple repos.
  • The latest version of Putty conforms to a different standard for SSH keys, so you have to convert them to use them.
When using multiple keys, I prefer a different method. Roll on the config file!!

SSH Config


With the advent of the AddKeysToAgent option since OpenSSH version 7.2 (February 2016), you now have the option to be prompted to add a key only when it's needed. That's pretty cool. This is done via an SSH config file. Check out the help page for more detail if you need to, but the below was suitable for my purposes. Namely accessing multiple GIT repos with minimal fuss.

First, you need to create the config file in your .ssh folder. The file needed is just "config" (no extension). In this file we'll put something like the following (adjust to your needs):


Host bitbucket.org
    HostName bitbucket.org
    User git
    IdentityFile ~/.ssh/id_rsa_bitbucket
    AddKeysToAgent yes
 
Host work.bitbucket.org
    HostName bitbucket.org
    User git
    IdentityFile ~/.ssh/id_rsa_work
    AddKeysToAgent yes

Host github.com
    HostName github.com
    User git
    IdentityFile ~/.ssh/id_rsa_github
    AddKeysToAgent yes


With this, I can have multiple keys, and only have the relevant one loaded when I actually need it. I have two BitBucket accounts (one for work and one personal) as well as a personal GitHub account. Let's break the above down.

Host: This is our alias. We actually change our repo URL's domain to match this. So for example, if I wanted to clone the repo git@bitbucket.org:me/repo.git which is in my work account, I would have to change the URL and run the following command:

  • git clone git@work.bitbucket.org:me/repo.git

Note that we've changed the URL to include "work." Everything that sits in the Host block is the config for that domain alias. If you already have a repo cloned and you need to change the URL, run "git remote set-url."

HostName: This is where the alias URL maps to. The actual domain.

IdentityFile: The path to the private key for your chosen account. i.e. without the .pub extension.

AddKeysToAgent: The magic bit. When set to "yes" it will dynamically load the key for your Host alias when its domain is called.

For extra info on the config, check out the online docs, but that's it for me.

SSH-Agent


Great! So now our keys get added dynamically and we only get prompted for a passphrase when it's needed. But we still need an agent to be running. Remember in part two when we pasted in some bash script to our .bashrc file to both start the agent and load the keys when we started Git Bash?  Well, now we only want it to start the agent. The keys are managed by the above config file.

Let's change it to this:

env=~/.ssh/agent.env

agent_load_env () { test -f "$env" && . "$env" >| /dev/null ; }

agent_start () {
    (umask 077; ssh-agent >| "$env")
    . "$env" >| /dev/null ; }

agent_load_env

# agent_run_state: 0=agent running w/ key; 1=agent w/o key; 2= agent not running
agent_run_state=$(ssh-add -l >| /dev/null 2>&1; echo $?)

if [ ! "$SSH_AUTH_SOCK" ] || [ $agent_run_state = 2 ]; then
    agent_start
fi

unset env


Try it! 


Now when you start Git Bash, it won't prompt you for your passphrase. But check your processes and you'll see ssh-agent running. Now access one of your repos (remember you should have set the domain alias). It's at this point you'll be prompted and it will cache the key. Do the same again with one of your other repos and it will prompt you for that one. Once added to the agent it will prompt you no more, for the duration of your agent's ephemeral lifetime.

Visual Studio Code


So back to Code. It doesn't look like Code supports SSH-Agent just yet, but as I mentioned in my previous post, you can get around this by running the command "code" in Git Bash. VS Code will inherit the environment of your Bash session, which includes the SSH-Agent environment variables. This is why I was considering the Putty approach, but with the config file now allowing dynamic adds, I much prefer SSH-Agent to Pageant.

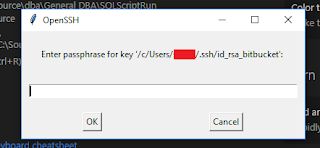
There is a way to streamline this though. I simply created a .sh file with just the word "code" in it. I then created a windows shortcut to run that file using Git for Windows. I made it prettier by adding the VS Code icon to the shortcut and used that for kicking Code off. It will even dynamically prompt you when access to a repo is needed.


VS Code Dynamic SSH prompt


The only downside being that launching Code via the context menus doesn't do it. Not perfect but close to it.

Who would have thought accessing GIT could warrant three posts, but this was part of my educational journey and was more about understanding than simply following a set of prescribed steps.

I hope this helps someone else. Let me know. Adios.

Part 1: HTTPS
Part 2: SSH


Sunday 8 April 2018

Accessing GIT (Part 2) - SSH

The alternative to connecting to your remote repository via HTTPS is, of course, SSH. This involves generating a key pair. Encryption is done locally via a private key and you provide the public key to your GIT provider for decryption. This involves a little more setup than for HTTPS but is ultimately a more secure method.

As with part 1, this post could be much shorter to just get you up and running with SSH in no time, but I went through the pain of getting to grips with all of this myself wishing there was a single place I could have got all of this information from. This is for folks who would like to understand a little more than just follow a step by step without really knowing why or what.

Creating the keys:


Find and follow the instructions for your chosen GIT repository. It will most likely involve generating your key-pair via the GIT Bash terminal using the command line ssh-keygen, which will generate the certificate files, and then pasting in the text from the new public key to your account. That's pretty much all there is to it.

For extra security, it's worth putting in a passphrase. This means that if anyone was able to get a hold of your machine or private key, they would still need a memorised key to use it. Some sites allow you to use 2FA in addition as well. You can avoid using a passphrase by just leaving it blank. This makes things simple, but for obvious reasons is not recommended.

Set your target:


In the first part on HTTPS, we cloned a repo using the HTTPS URL. We could do the same here but by selecting the SSH option from the drop-down. It should look something like:

    git@github.com:UserName/Myrepo.git

compare this to the HTTPS URL of:

    https://github.com/Username/Myrepo.git

Or if you'd rather change one of your repo's that is currently set to HTTPS to SSH, you can do this too. Just run:

    git remote set-url origin git@github.com:UserName/Myrepo.git

To check, you can list your configured remote URLs with:

    git remote -v

Just be aware; If you connect for the very first time using a more GUI based software like VSCode, you may just get an error as it won't give you this message. Best do the first connect in GIT Bash.

Try it out:


Start with a git pull. The first time you connect it will ask you if you are sure you want to connect to the server and give you the fingerprint for that server. You can check your provider's documentation to confirm you're connecting to the right fingerprint.

At the time of writing this, you can find the RSA fingerprints for BitBucket and GitHub here:

BBhttps://confluence.atlassian.com/bitbucket/troubleshoot-ssh-issues-271943403.html?_ga=2.97089951.1499627191.1523138139-1040706359.1522752215

GHhttps://help.github.com/articles/github-s-ssh-key-fingerprints/

If you avoided using a passphrase when setting up your key-pair, then that's it. You never have to worry about connecting again. But if you (and you should) use a passphrase for more security, it gets annoying as you're asked for that key-phrase every single time you interact with the remote repo. That's where ssh-agent comes in.

SSH-AGENT:


SSH-Agent allows in-memory storage of a key. This runs within the session that kicked it off. You can manually start the agent in your session and add your key to it as follows:


    #Start the agent:
    eval $(ssh-agent -s)

    #Add your key:
    ssh-add ~/.ssh/id_rsa

You'll be asked for your passphrase when adding the key, but after that and for the duration of your session, you will no longer be asked for it.

Exit the terminal and you'll have to do it again. Yeah, it's not great to have to do this manually every time. Fortunately, like with PowerShell profiles, you have the ability to run set of commands automatically on each session start-up. Namely the .bashrc file which you should be able to find in your user folder.

You could just copy the above into the .bashrc file but GitHub gives us a much cleaner snippet to use.

The below snippet is taken from https://help.github.com/articles/working-with-ssh-key-passphrases. Just paste it into your .bashrc file.

env=~/.ssh/agent.env

agent_load_env () { test -f "$env" && . "$env" >| /dev/null ; }

agent_start () {
    (umask 077; ssh-agent >| "$env")
    . "$env" >| /dev/null ; }

agent_load_env

# agent_run_state: 0=agent running w/ key; 1=agent w/o key; 2= agent not running
agent_run_state=$(ssh-add -l >| /dev/null 2>&1; echo $?)

if [ ! "$SSH_AUTH_SOCK" ] || [ $agent_run_state = 2 ]; then
    agent_start
    ssh-add
elif [ "$SSH_AUTH_SOCK" ] && [ $agent_run_state = 1 ]; then
    ssh-add
fi

unset env

If the file doesn't exist, you'll have to create it, which is difficult in Windows as it doesn't like having files with an extension but no name. To create it run:

    echo "" > .bashrc

Once you save that and exit, you'll be prompted once for your passphrase whenever you start a GitBash session, and then no more for the duration of that session.

VS Code


"Brilliant!" I hear you say! Not quite perfect yet though. Try doing a push or pull via VS Code now and you'll be greeted with an error message:


Example errors from two popular repos. Permission denied (publickey) for BitBucket and Host key verification failed for GitHub. Bummer.

Remember SSH-Agent runs under the agent that started it. VS Code isn't running one. The simplest way right now to get around this is to simply start VS Code from a GitBash session that is running the agent. Simply execute "code" in GitBash to start VS Code and try a push or pull again. Bingo.

So great. That should set you up nicely, though I'm not entirely happy with the workaround for VS Code. But maybe I'll address that in part 3. :)

Part 1: HTTPS
Part 3: SSH Config with multiple GIT accounts


Thursday 5 April 2018

Accessing GIT (Part 1) - HTTPS

So you've decided to help out on an open source project and clone a repository, or maybe start your own GIT repository somewhere like GitHub or BitBucket. Whatever the reason you'll need to decide on how to interact with your remote repository. HTTPS or SSH.

Let's play with both options. I'm assuming you have an account with your provider of choice. We'll use GitHub as an example but it won't matter if you have one of the alternatives. Just replace any mentions of GitHub with the name of your provider. I will also assume you have an existing repo as well. Gitbash will be our tool of choice.

HTTPS:


  • No setup required and no special ports required. 
  • Authentication is done via a username and password. 
  • You can also add 2 factor (2 step) authentication for extra security. 
  • Your login is the same as the one for logging into your account. So you use the same credentials for pushing, pulling, etc as well as logging into your account and changing account settings. Beware if your login is compromised.


I would suggest using 2-factor authentication and enforcing it at the account level so that all users have to use it. There will just be an additional authentication step, such as using an App on your phone to generate a code.


Get the clone URL for your repo from GitHub. Make sure you choose HTTPS. It should look something like this:
https://github.com/Username/Myrepo.git

Now clone it.

git clone https://github.com/Username/SandBox.git

If it's a public repo it'll clone. If not you should be prompted for a login. It's probably a public one, so let's do a push. Just add a file, commit it and do a git push. You should get a prompt like this:


2FA:

Of course, if someone were to learn your password the could wreak havoc in your code. Hopefully, you've configured 2 Factor (or 2 step) authentication. There is more than one way to do this so best refer to your provider of choice. Such as an app called Authy which generates access codes. If you have this set up there will be an additional prompt after submitting your credentials.

Credential Manager:

For every action you take against your remote repo, you need to submit your credentials all over again, which is a real ball ache, especially when you have 2FA enabled. Or at least it would be if you didn't have the help of Credential Manager. Remember when you installed GIT you should have seen something like this:


By default, "Enable Git Credential Manager" should be ticked. If it's not enabled, you can enable this later with the following line in Git Bash:

    git config --system credential.helper manager

Note: you may need to run as Admin to change any system config.

You'll also notice a difference in your login experience with it enabled vs disabled. Especially if you have 2FA where you might get an error if credential.helper is disabled.

If you want to play around and see how it looks, you can disable the credential.helper by unsetting it as follows:

    git config --system --unset credential.helper manager

Of course, if you have this set at local or global level as well as system, you'll need to do the same there.

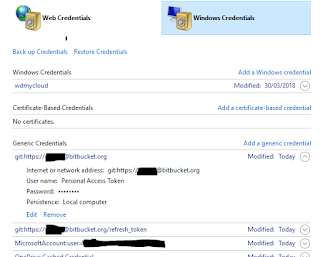
You can also check out the Windows Credential Manager while you do this. Just search for an open "Credential Manager"

You can delete stored credentials from there while you experiment if you like, to force a credential prompt.

Once you've set it up, you should be good to go with VS Code as well. The same settings will apply there. But there is another method to connect. We'll cover SSH in part 2.

Part 2: SSH
Part 3: SSH Config with multiple GIT accounts


Deploying out of hours shouldn't be a thing

Getting code into production should not be hard. Nor should it have to be scheduled for special times. I have recently been involved with th...